
Portals
Customer/Vendor Portal Setup
Support Guide
-
Overview
The Striven Customer/Vendor Portal is an extremely useful addition to enhance your Customer/Vendor’s experience with Striven. The Customer/Vendor Portal includes many features that will assist your Company in communicating and working effectively with your Customers/Vendors. With specific Portal Roles, designating what pages can be accessed per Contact will ensure security is being maintained for different types of Contacts that may log in to the Customer/Vendor Portal.
Read this guide if you are trying to:
✔ Designate settings for your Customer/Vendor Portal.
✔ Configure and assign Portal Roles to Customer and Vendor Contacts.
✔ Review process for logging in to the Customer/Vendor Portal.
-
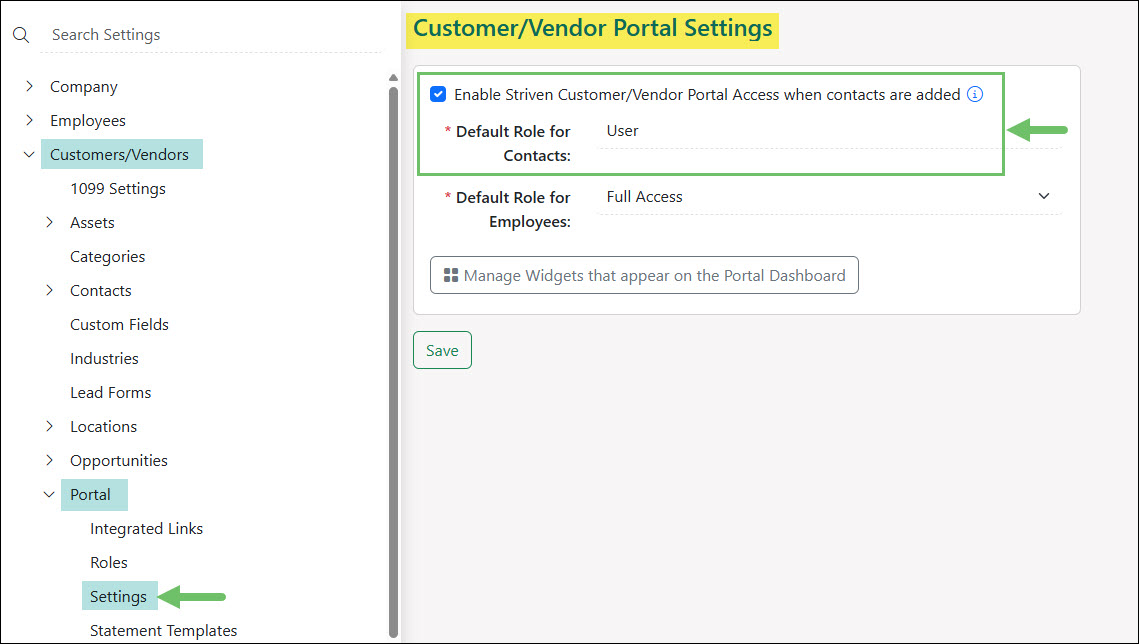
Customer/Vendor Portal Settings
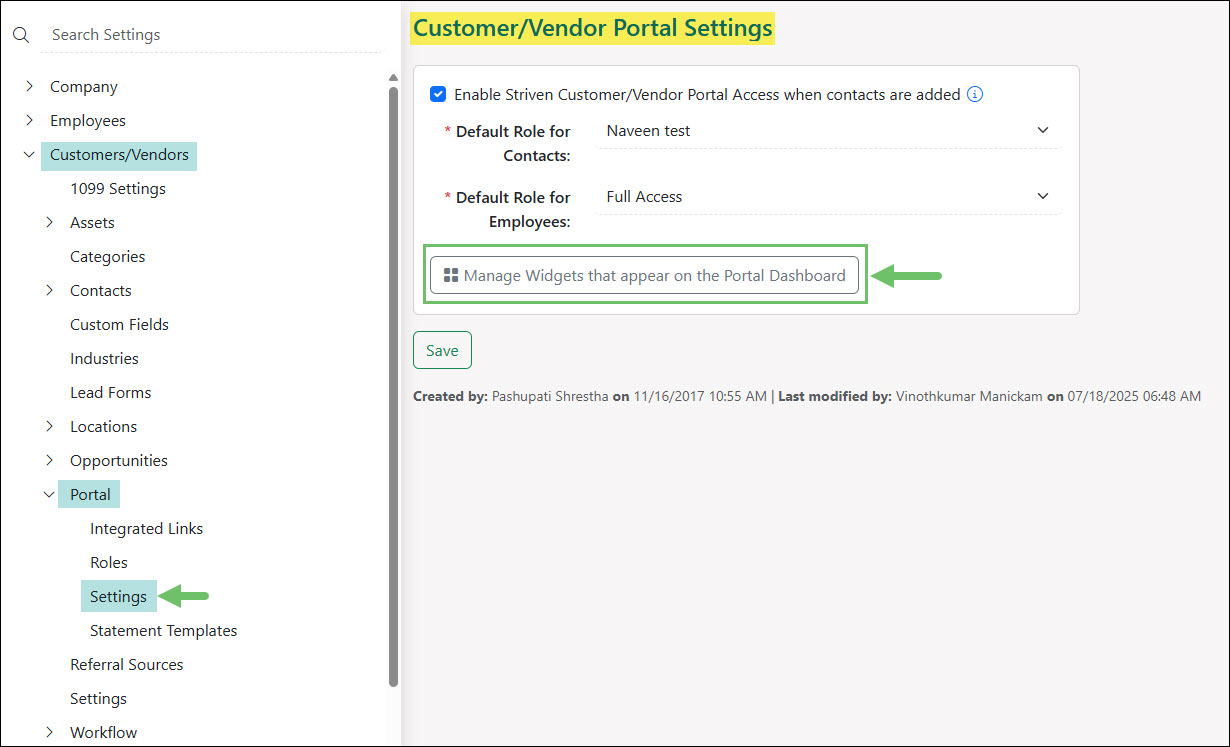
Your default Customer/Vendor Portal Settings can be set within your Portal Settings page by navigating to:
Company → Settings → Customers/Vendors → Portal → Settings.
From this page you will have the ability to determine the configuration for the following settings:
- Access Settings: Allows you to designate whether or not Customer/Vendor Portal Access is enabled upon creation of the Contact. This is a very important setting, especially if you do not wish to utilize the Customer/Vendor Portal. To avoid unwanted Portal subscription fees, please ensure the box to Allow Striven Customer/Vendor Portal Access on Creation is not checked.
- Note: If you miss this step or find you need to remove Portal access for your Customers/Vendors in bulk, there are instructions listed below this section to easily accomplish this.
- Default Role for Contacts: Determines the default Portal role assigned to Customer/Vendor Contacts.
- Default Role for Employees: Determines the default Portal role assigned to your Employees when they access a Customer/Vendor’s Portal.
- Manage Dashboard Widgets: Displays available widgets for the Customer/Vendor Dashboard configuration. More details on these settings are provided below.

Example of Striven Customer/Vendor Portal Settings

- Access Settings: Allows you to designate whether or not Customer/Vendor Portal Access is enabled upon creation of the Contact. This is a very important setting, especially if you do not wish to utilize the Customer/Vendor Portal. To avoid unwanted Portal subscription fees, please ensure the box to Allow Striven Customer/Vendor Portal Access on Creation is not checked.
-
Managing Dashboard Widgets
To adjust which widgets will appear on the Customer or Vendor Portal Dashboards, navigate to Company → Settings → Customers/Vendors → Portal → Settings. Once on the Customer/Vendor Portal Settings page, click the Manage Widgets that appear on the Portal Dashboard button to decide which widgets should appear for your Customer or Vendor when they log into the Portal.
Example of the Customer Vendor Portal Manage Widgets Settings Location
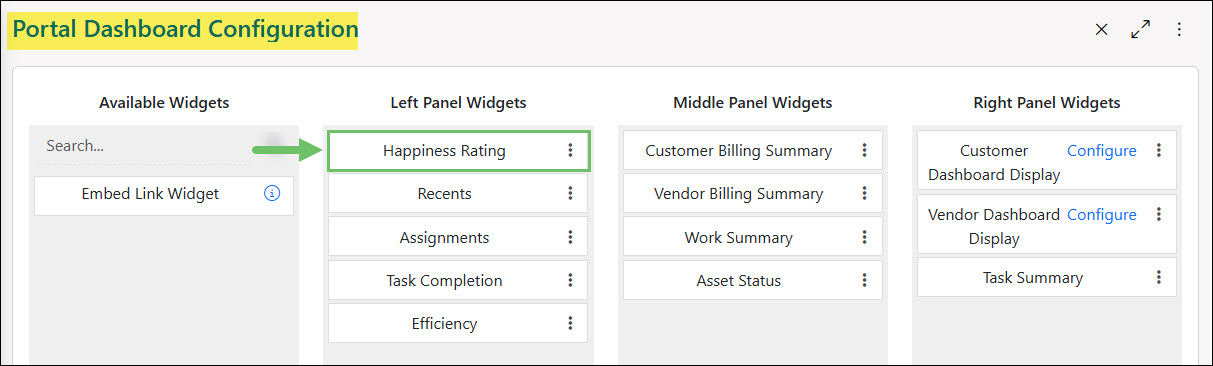
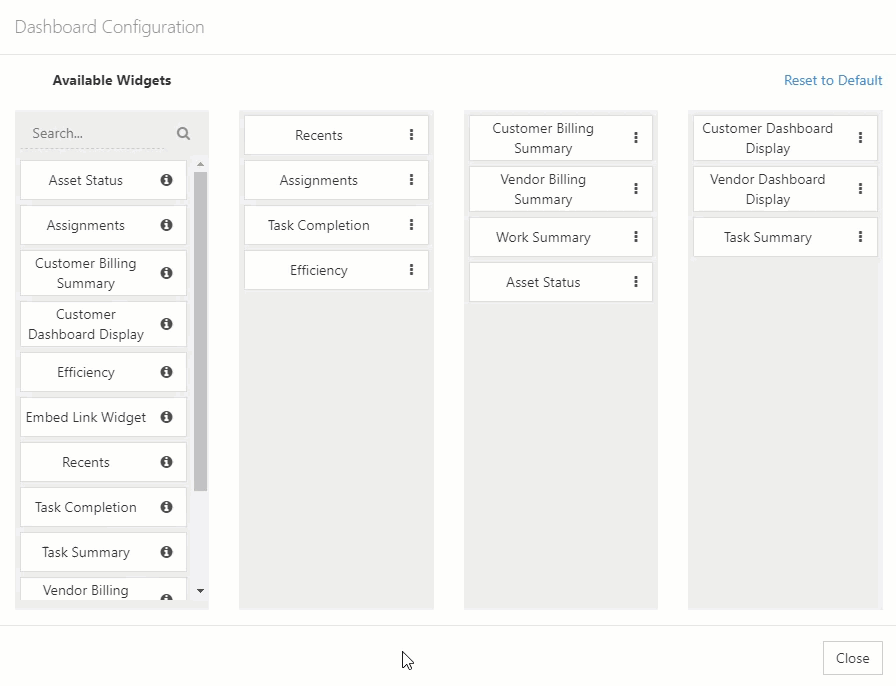
The Portal Dashboard Configuration page will allow you to add, remove, or rearrange widgets for the Customer/Vendor Portal Dashboard. To change the location or which panel the widget resides in, simply click and drag the widget to the desired spot. Below is a screenshot illustrating how the Portal Dashboard Configuration page appears and a description of what can be accomplished there.
- Available Widgets: Lists widgets that have either not been added to a panel or can have multiples of the same widget within the panel. Click and drag the widget to the desired spot to add it to the Customer/Vendor Portal Dashboard.
- Vertical Ellipsis: Gives the options to either Edit the widget which allows the name of the widget to be changed or Delete the widget which removes the widget from the Portal Dashboard.
- Configure: The Vendor Dashboard Display and Customer Dashboard Display widgets give the option to include any information you would like to display to your Customer or Vendor, such as a welcome message, a hyperlink, images, etc. The Embed Link Widget option will allow you to select a URL or Integrated Link to display in a widget on the Customer/Vendor Dashboard.
- Reset to Default: Reverts the Customer/Vendor Portal Dashboard back to the original layout and configurations.

Example of the Portal Dashboard Configuration Page
-
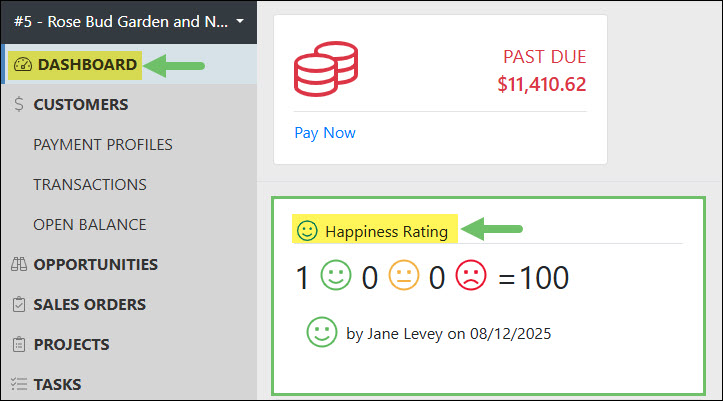
Happiness Rating Widget
Happiness Ratings are a way for Contacts through the Portal leave feedback as to whether they are Happy, Satisfied, or Unhappy with services being completed. Ratings left by a Company can be viewed by other Contacts that are logged in to the Portal through the Happiness Rating Widget on the Dashboard in order to have a more collaborative and open view of the overall happiness of the logged-in users colleagues.
Example of the Happiness Rating Widget on the Dashboard
To have the Happiness Rating Widget be visible to Customer/Vendor Contacts logging into the Portal, a two-step process will need to be completed.
The widget will first need to be added to a panel when viewing the Portal Dashboard Configuration page.
Example of the Happiness Rating Widget added on the Portal Dashboard Configuration Page
Next, the user logging in will need to have the permission “Happiness Rating Widget: View” added to their Portal Role.

Example of the Happiness Rating Widget Permission
Learn more about managing Portal Roles and Permissions for the Customer/Vendor Portal by reviewing the Customer/Vendor Portal Roles section in the Customer/Vendor Portal Setup Guide.
-
Customer/Vendor Portal Embed Widget
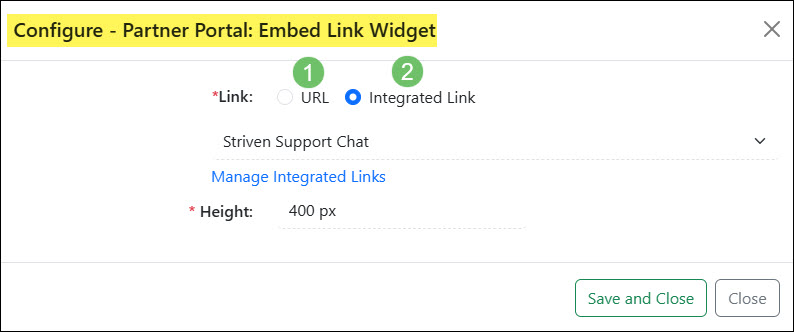
Similar to other Embed Link Widgets within Striven, this feature will allow you to select a URL or Integrated Link to display in a widget on the Customer/Vendor Dashboard.
The settings for this option can be found by visiting Company → Settings → Customers/Vendors → Portal → Settings from within your Striven system.
From here, you’ll click on the Manage Widgets that appear on the Portal Dashboard option and add the Embed Link Widget onto one of the panels for the Customer/Vendor Portal Dashboard. Once the Embed Link Widget has been added to a panel, click the Configure button in order to set up the widget.
There are 2 available options for the Embed Widget link:
- URL: Allows you to enter the web address link used to direct your internet browser to a particular website.
- Integrated Link: Allows you to choose from the list of Integrated Links you have already set in your system. (This list can be edited by visiting Company → Settings → Customers/Vendors → Portal → Integrated Links).
Note: Both options will also have the ability to set your widget Height settings from this section.
Example of the Configuring an Embed Link Widget for the Portal Dashboard
To add this Embed Link Widget to your Customer/Vendor Portal Dashboard, you can click into the Manage Dashboard Widgets settings and drag the Embed Link Widget option to whichever column position you wish to view the widget in.
Example of Adding Embed Link Widget to Customer/Vendor Portal Dashboard
By clicking on the breadcrumb menu to the right of the widget, you’ll be able to click Edit to change the name of the widget, then click the green check mark to save.
Now when you view your Customer/Vendor Portal Dashboard, the Embed Link Widget should display on the page according to your settings.
- Note: Not all integrated links or URLs will work as embedded links on the Customer/Vendor Dashboard as some websites may block the ability to embed their content.

Example of Editing an Embed Link Widget Name
An Embedded Link Widget enables you to share videos or websites you want to bring to your Customer/Vendor’s attention. For example, perhaps you want to provide a helpful tool in your Portal, such as a calculator or chat option, or even something simple, like a recorded video announcement or holiday greeting you’d like to share with your Customer/Vendors. Using this new feature gives you the opportunity to share relevant content from within your Customer/Vendor Portal.
-
Customer/Vendor Portal Integrated Links
Striven provides the ability to add integrated links to the Customer/Vendor Portal. This option will allow your Company to provide links to external websites by embedding their URL into the Customer/Vendor Portal.
You can configure your Integrated Links by navigating to Company → Settings → Customers/Vendors → Portal → Integrated Links.
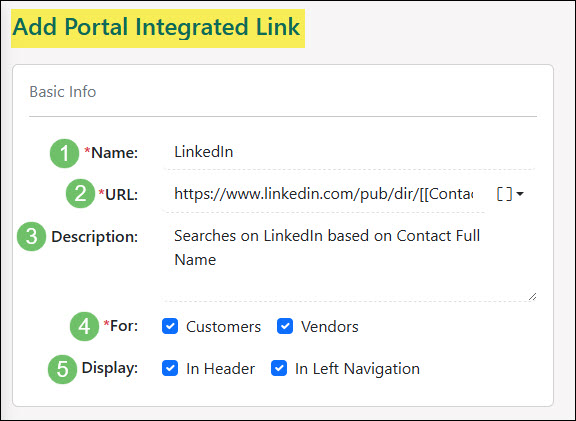
To add an Integrated Link to the Customer/Vendor Portal, click the plus sign button at the top of the Portal Integrated Links list.

Example of the Portal Integrated Links List
Below is a screenshot illustrating how the Add Portal Integrated Link page appears and a description of what can be accomplished there.
- Name: Displays as the Integrated Link name when logged into the Customer/Vendor Portal.
- URL: Accesses the Integrated Link from the Customer/Vendor Portal.
- Note: Using the Select Merge Fields icon next to the URL field will assist in personalizing the links to your particular Customer or Vendor. For example, adding Customer/Vendor – Zip as a merge field after the URL for Weather.com will ensure the link includes the Customer/Vendor’s Location based on their Zip Code so when the Customer/Vendor clicks on the link, the page will automatically display the weather for that particular Customer/Vendor’s Location, provided you have their address, including the Zip Code, saved in your system.
- Description: Displays when the Portal User hovers over the Integrated Link.
- For: Determines if the Integrated Link is available for Customers, Vendors, or both when logged into the Customer/Vendor Portal.
- Display: Determines if the Integrated Link will appear in the side menu or the top menu when the user is logged in to the Portal.
Example of Adding an Integrated Link for the Portal
Below is a screenshot illustrating how the Customer/Vendor Portal will appear with an Integrated Link added in both the side and top menu.
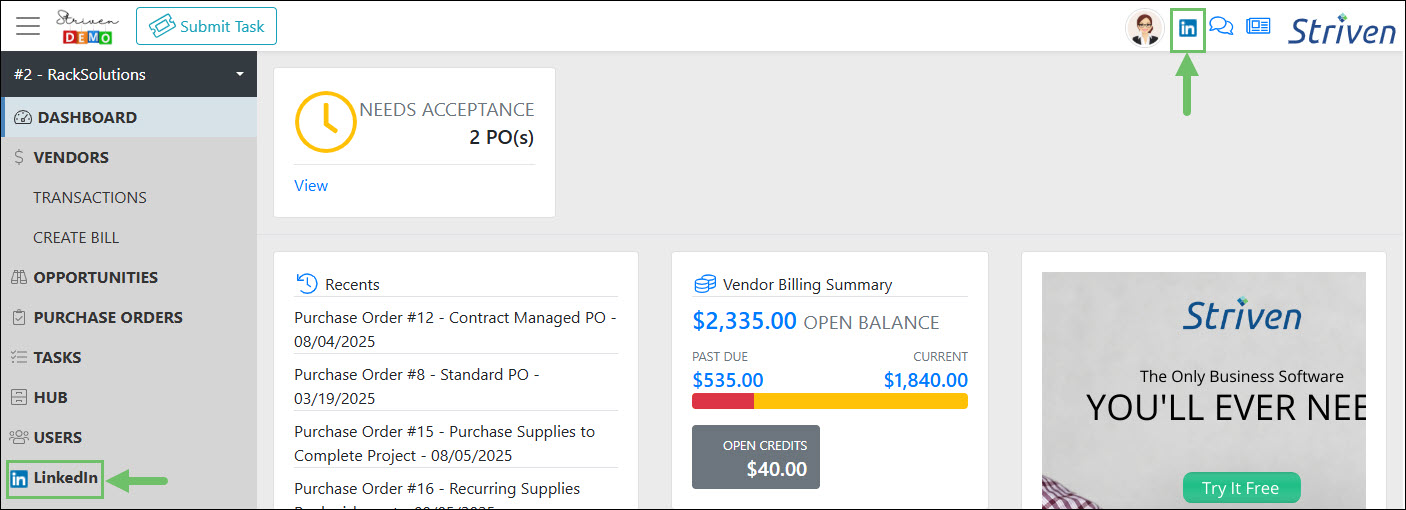
Example of Integrated Links Added in the Customer and Vendor Portal
-
Customer/Vendor Portal Roles
Customer/Vendor Portal Roles will determine the permissions given to your Customers/Vendors when accessing your Customer/Vendor Portal. Your Striven system provides both a Full Access and User Role option to assign to your Customers/Vendors. Full Access would provide the User with access to all areas of the Customer/Vendor Portal, whereas the User Role has a limited set of default permissions related to the Portal. Below is an example of the Portal Roles page with a description of what you can configure there.
To access the Customer/Vendor Portal Roles settings, navigate to:
Company → Settings → Customers/Vendors → Portal → Roles.
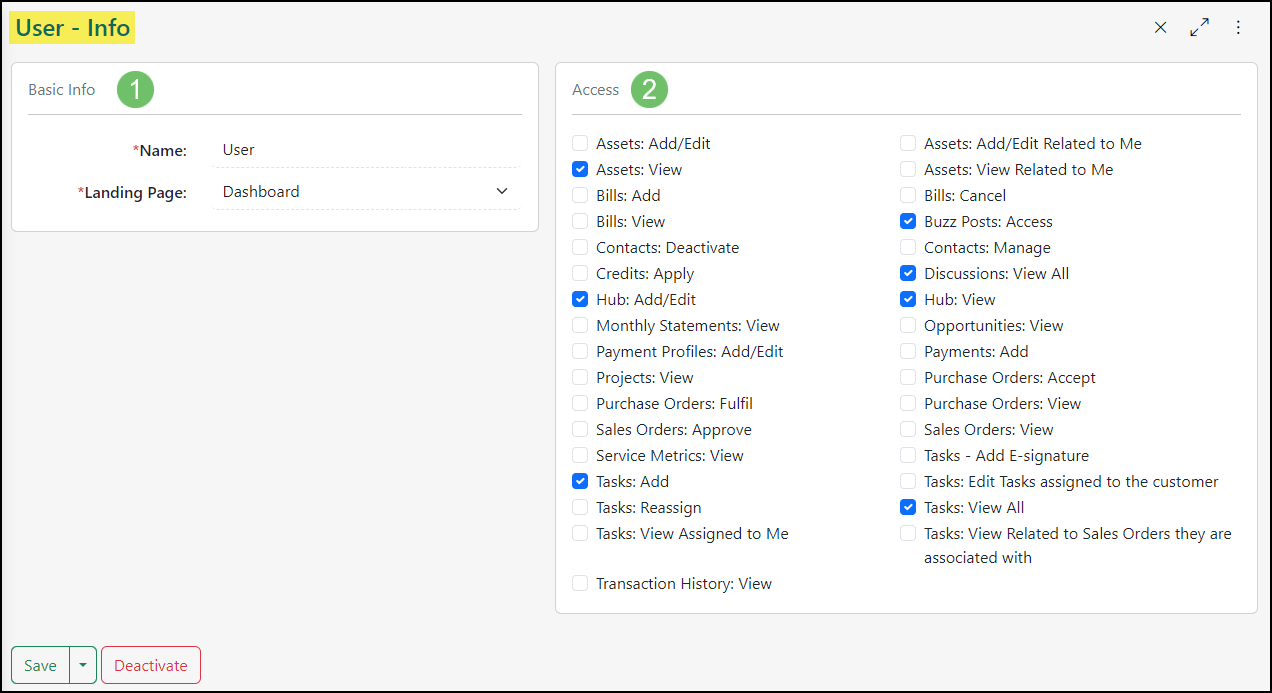
- Add: Triggers the Portal Role Info page to pop up wherein you can create a new Portal Role. Here, you can name the Role, choose the Landing Page for the Portal, and select the desired permissions you wish to be designated for this Role. (An example of this page can be observed below).
- Search: Displays the Search options allowing you to narrow the results listed on the Portal Roles page. You can choose to search Roles by Status or Name.
- Role Name: Selecting the Name allows you to edit the Name, Landing Page, or permissions related to an existing Portal Role.
- Deactivate: Switches the Role to an Inactive status.

Example of Customer/Vendor Portal Roles Page
When viewing a Portal Role – Info page, you may configure the access available to the Role, as well as the Role’s Basic Info with the following options.
- Basic Info: Allows you to edit Role’s Name and the Landing Page users with this assigned Role will be directed to when accessing the Portal.
- Access: The Access section allows you to choose the entities and actions users assigned to this Role may view and perform within the Portal.
Example of Adding a Customer/Vendor Portal Role
-
Setting Portal Roles & Welcome Emails
During configuration of your Customer/Vendor Portal Settings, you will determine whether or not a new Contacts’ default role is set upon creation of the Contact in your Striven system.
Example of the Default Portal Role for Contacts in the Portal Settings
If new Contacts are set to automatically receive Portal access, you will have the option to check the box to Send the Welcome Email during Contact creation in order for them to be able to sign in to the Portal. If you do not wish to have this designated as an automatic setting, you have the option to assign or change Customer/Vendor Portal roles at the Contact level with whatever permissions you select.
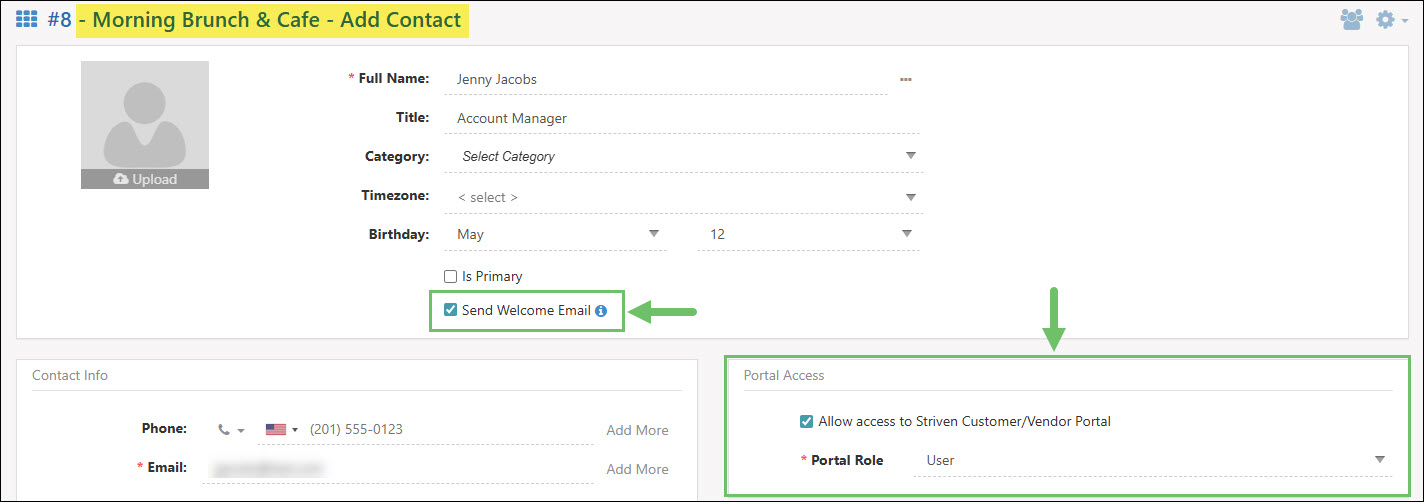
Example of Portal Options When Adding a Contact to a Customer
There is also a link on the Contact Info page to Send Welcome Email in the event they have never signed in but need the email sent to register for the Portal.

Example of the Send Welcome Email Option for a Customer Contact
-
Default Portal Roles at the Customer/Vendor Level
Default Portal Roles can be configured at the Customer/Vendor level, allowing Contacts associated with these accounts to have a Portal Role which overrides any Company level defaults.
When viewing a Customer/Vendor Dashboard, the Default Portal Role option will be located within the Other widget. You may select a configured Portal Role from the drop-down menu. Once a Contact with Portal access is created, this Portal Role will be automatically assigned to them.
If a Contact is created by an API, or an existing Contact is associated with a Customer/Vendor that has a Default Portal Role configured, the Contact will inherit this Portal Role.
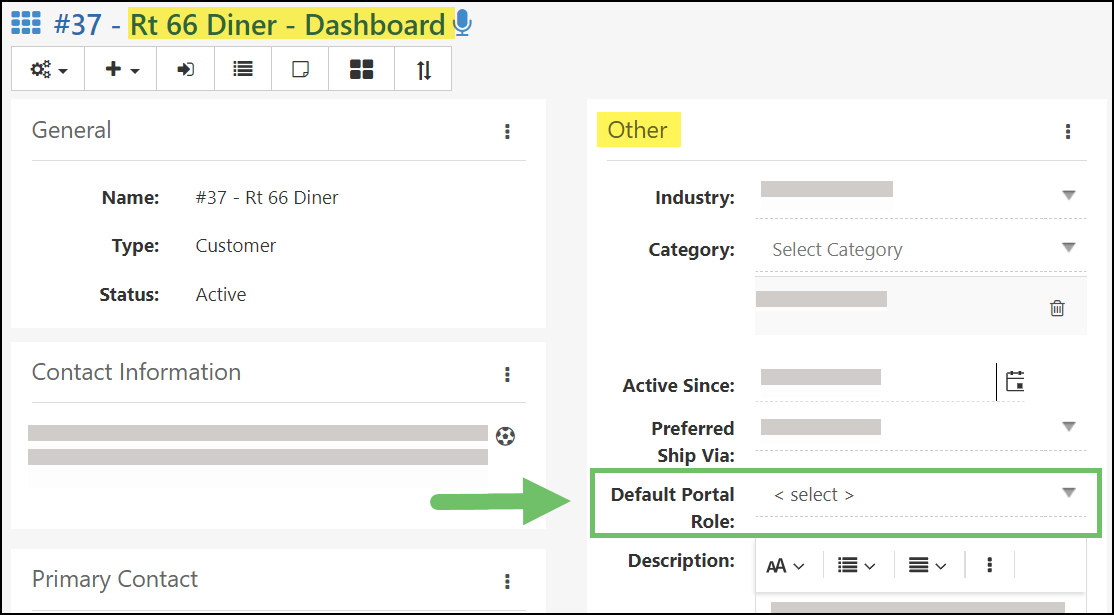
Example of the Default Portal Role Option at the Customer/Vendor Level
-
Removing Portal Access
There may be cases where a Contact has been given access to the Customer/Vendor Portal and you wish to remove that access. Whatever the reason, the solution is rather simple.
Removing Portal Access Individually
If you have an individual or small number of Contacts you wish to remove Portal access from, the easiest way would be to navigate to the Customer’s record in your system. From there, you can use the waffle menu to navigate to the Customer’s Contacts list.
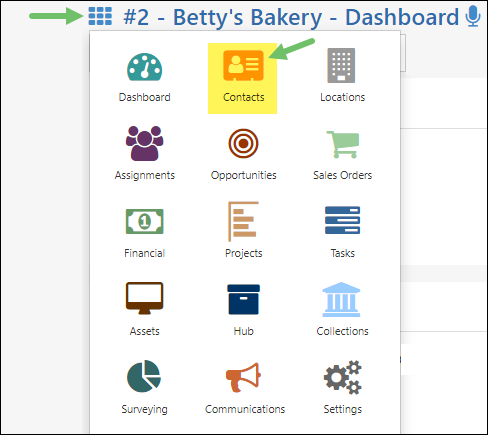
Example of the Contacts Option on a Customer’s Waffle Menu
Once the Customer’s Contact List displays, you can select the individual Contact whose Portal access you wish to update. On the Contact Info Page, you’ll see the Portal Access section on the right side of the page with the checkbox to enable or disable the setting to Allow Access to Striven Customer/Vendor Portal. Unchecking this box will remove the Contact’s Portal access and they will no longer be able to login to the Portal. Remember to click the Save button to save your changes.

Example of the Portal Access Option on a Customer Contact Info Page
These simple steps can be repeated for each of the Contacts from which you wish to remove Portal access. If you determine you have a larger number of Contacts you wish to remove Portal access from, you can review the steps for that process below.
Removing Portal Access in Bulk
The process to remove Portal access from ALL of your Customer Contacts at once is a bit more involved, but the following steps should be straightforward and easy to follow.
The first step you will want to take is to create a custom report using Striven’s Report Builder. This feature can be located by navigating to
Reports → Report Builder. Then, click on the blue Plus (+) button to add a new report.

Example of the Add Report Button on the Reports Page
In order to gather the necessary details for this process, you will need to select the Customer/Vendor Contacts Dataset in the Based On field, enter a Name for your report, and then click Proceed.
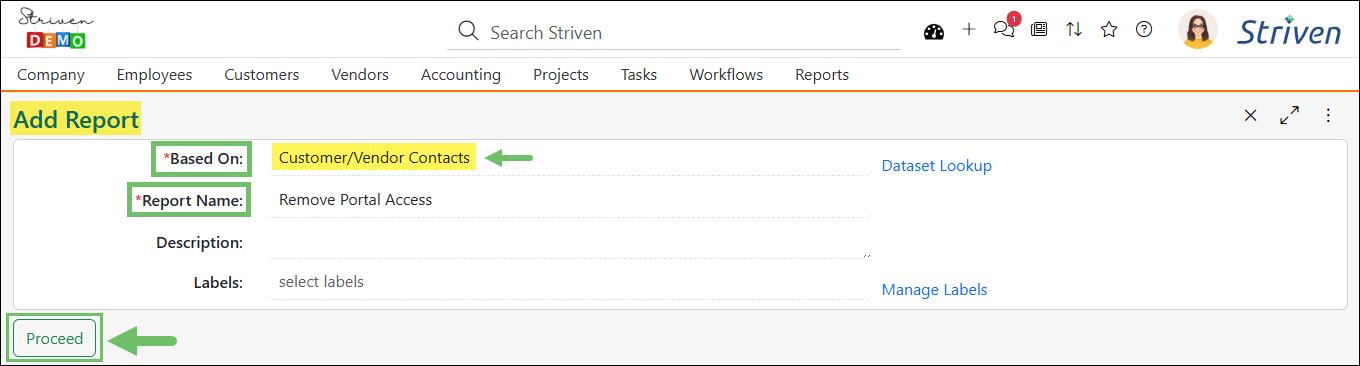
Example of Creating a Custom Report Based On Customer and Vendor Contacts
Next, on the report Info page, locate the Filters panel and click on the Add Filters button to configure the parameters that will limit your report results to only the Contacts for which you wish to remove Portal access.
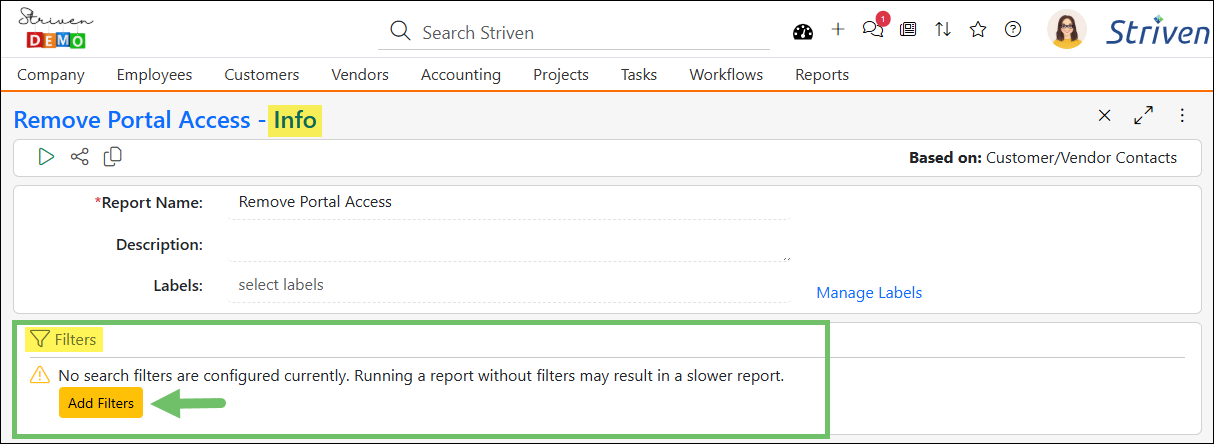
Example of the Add Filters Button
Select the following recommended filters and then click Save.
- Customer/Vendor Contact: Has Customer / Enter Value / Equal To / Yes
- Customer/Vendor Contact: Has Access To Portal / Enter Value / Equal To / Yes

Example of the Recommended Filters for Removing Portal Access to All Customer Contacts
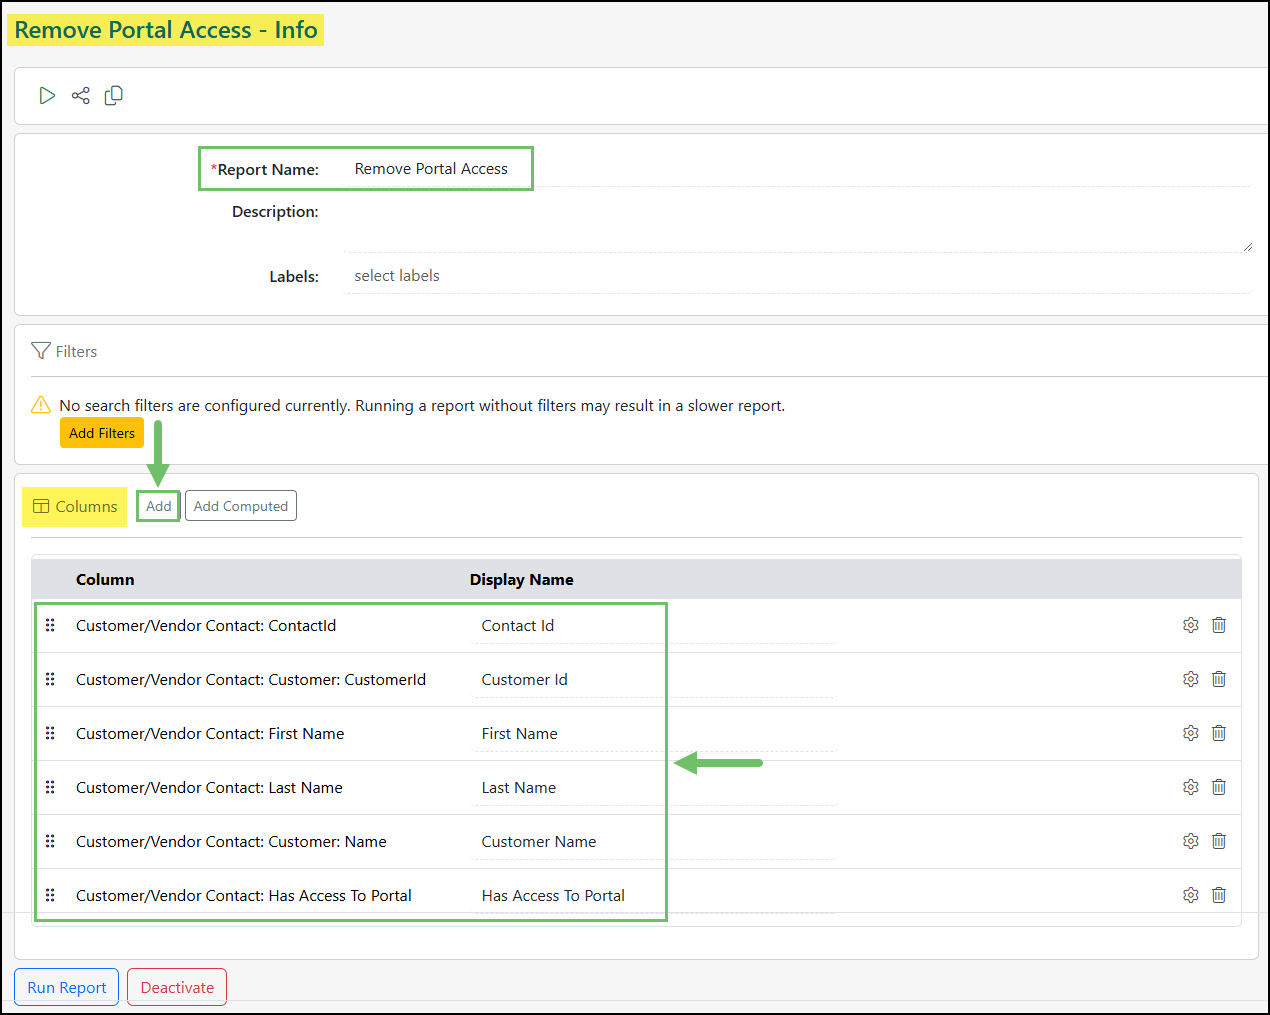
Back on the report Info page, click on the Add button in the Columns panel to search for and add the following recommended columns:
- Customer/Vendor Contact: ContactId
- Customer/Vendor Contact: Customer: CustomerId
- Customer/Vendor Contact: First Name
- Customer/Vendor Contact: Last Name
- Customer/Vendor Contact: Customer: Name
- Customer/Vendor Contact: Has Access To Portal
Example of the Recommended Columns for Removing Portal Access
Once you have your columns and filters set, you can click the Run Report button to see the results. Click on the Export button located on the left side of the page and choose the CSV option to download your report results in a file format that will be compatible with importing into Striven. You will then be able to edit the details in this document to use for importing and updating the data back into Striven.

Example of the CSV Export Option
Once you have exported the report as a .CSV file, you should open it and change the “Yes” responses in the Has Access To Portal column to “No” for each Contact listed.
Remember to save your edits to the file in a .CSV file format for importing.
After the import file is prepared, return to Striven and navigate to Customers → Contacts to view the Contacts List page.
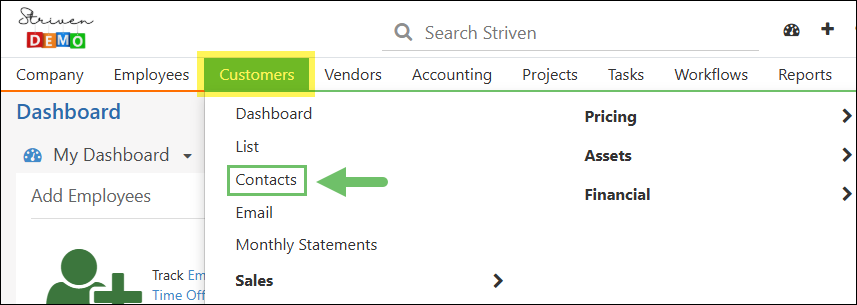
Example of the Contacts List Option on the Customers Menu
Click on the Import button and select Contacts.
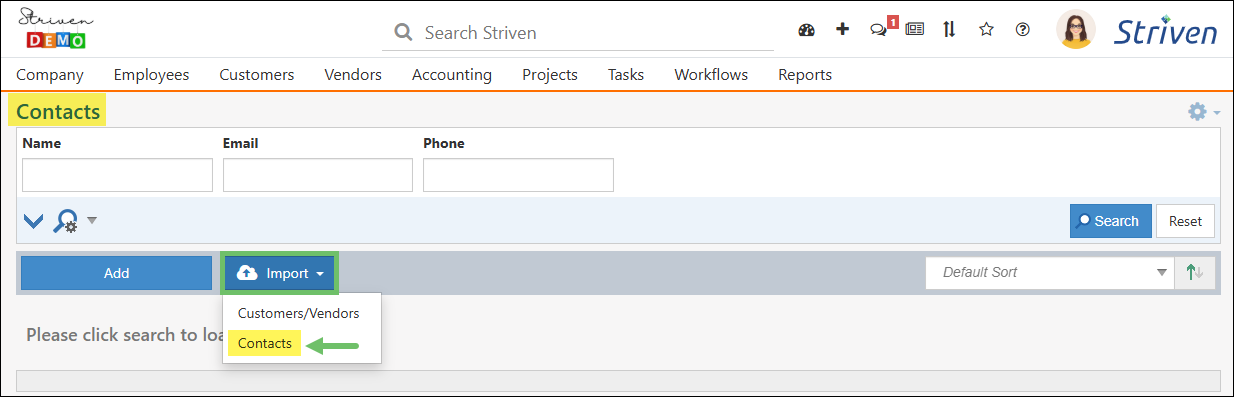
Example of Contact Import Option on the Contacts List Page
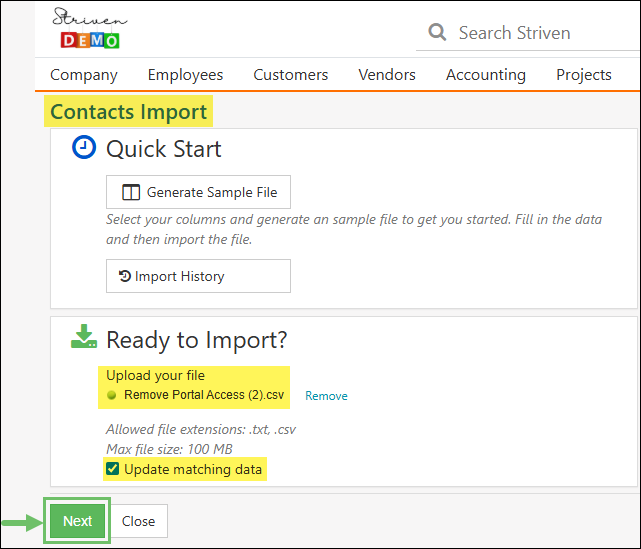
On the Contacts Import page, select the .CSV import file you have prepared for the upload file. Before you click Next, make sure the box for Update Matching Data is checked. If this box is not checked, the Portal access will not be updated successfully. Click the Next button to continue with the import.
Example of the Contacts Import Page
Now, you will need to set the Import Mapping. Use the drop-down lists and make sure the Sources are mapped as follows:
- ContactId is mapped to “CONTACT ID”
- Customer: CustomerId is mapped to “CUSTOMER/VENDOR ID”
- First Name is mapped to “FIRST NAME”
- Last Name is mapped to “LAST NAME”
- Customer: Name is mapped to “CUSTOMER/VENDOR NAME”
- Has Access To Portal is mapped to “ALLOW ACCESS TO CUSTOMER/VENDOR PORTAL”

Example of the Contact Import Mapping for Removing Portal Access
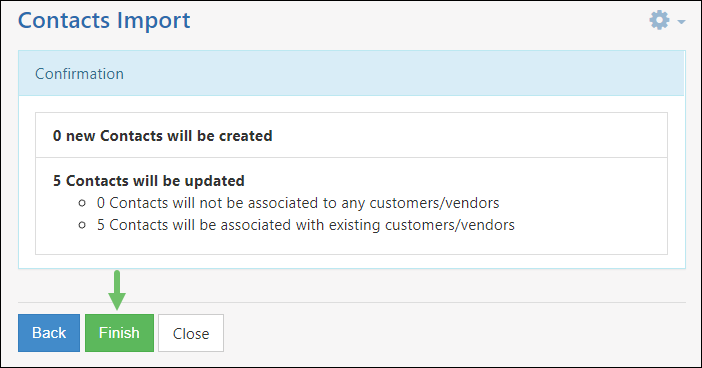
Click Finish on the Contacts Import Confirmation page to complete the import.
Example of Contacts Import Confirmation Page
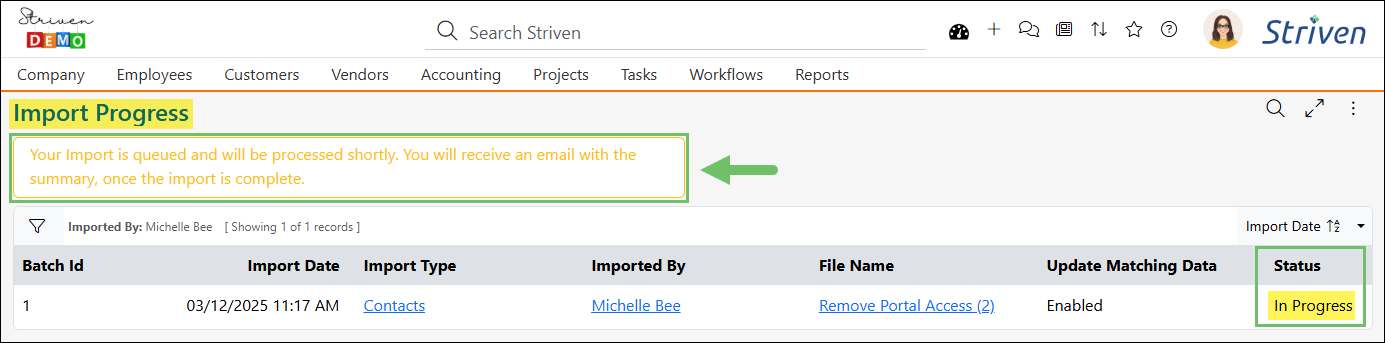
The Import Progress page will display with a notification that your import is queued and that you will receive an email notification with the import summary once it is completed.
Example of the Import Progress Page
It is recommended that you return to the Report Builder page and run the custom report you created again in order to confirm the Portal access for Customer Contacts was properly updated.
- Note: If multiple Associations were created for a Contact, it is possible that only one Association may have been updated and others may need to have the Portal access updated manually.
The steps above were to guide you through removing Portal access from ALL of your Customers in Striven, but additional report filters may be used to narrow down your list more specifically. This way, you can easily remove access from a more particular group of Customers at one time. For more details related to the Report Builder feature in Striven, please review our Report Builder Guide.
-
Signing In to the Customer/Vendor Portal
The URL to Sign In to the Customer Portal is customers.striven.com.

Example of the Log In Page for the Customer Portal
The URL to Sign In to the Vendor Portal is vendors.striven.com.
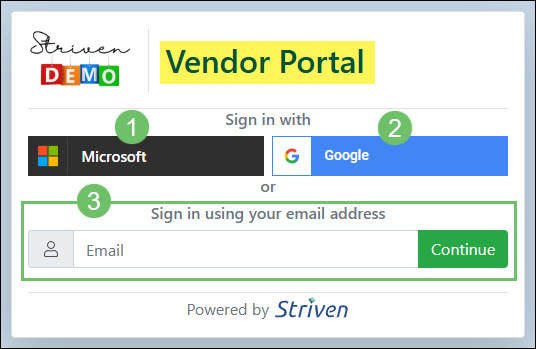
Example of the Log In Page for the Vendor Portal
- Microsoft Single Sign On: Using the Microsoft Single Sign On option will allow the user to enter the Portal without the use of a password or code. The email address used for the single sign on needs to match the primary email address saved in the system for the Contact.
- Google Single Sign On: Using the Google Single Sign On option will allow the user to enter the Portal without the use of a password or code. The email address used for the single sign on needs to match the primary email address saved in the system for the Contact.
- Email Log In: Enter the email address you wish to log in with that is on file for the Contact profile in Striven. Once entered, clicking the Continue button will navigate to the next step to either enter a password or receive a code in order to access the Portal.
When adding a Contact to a Customer, an option will be available to Send Welcome Email. The email that the Contact receives will have the option to Set Up Password which can then be used in future log in attempts to the Portal.

Example of the Send Welcome Email Option and Email Received to Set Up Password
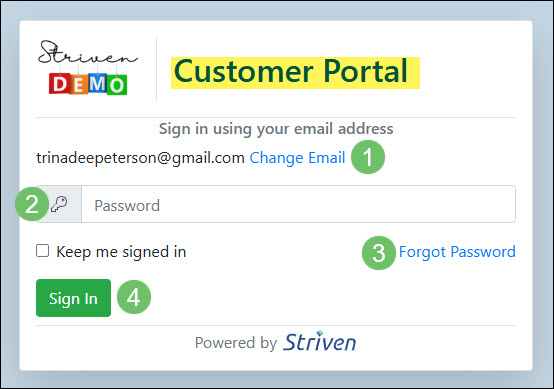
If a password has been set up for the Contact previously, after entering their email on the Log In page and clicking the Continue button, they will be prompted to enter their password in order to successfully log in to the Portal. Below is a screenshot illustrating how the Password Entry page appears for the Customer Portal and a description of what can be accomplished there.
- Email/Change Email: Displays the email that was previously entered to log in along with an additional hyperlink option to return to the previous page in order to enter a different log in email address.
- Password: A field to enter the password that has been previously created for the user.
- Forgot Password: Emails the user with instructions on how to reset their password.
- Sign In: Completes the sign in process and navigates the user to the Portal landing page.
Example of the Password Entry Page for the Customer Portal
If a password has not yet been created for the Contact, the user will be prompted to enter a code. Once they have entered their email address into the Log In page and clicked the Continue button they will be asked to enter the code in order to log in or set up a password. The code will be provided through an email that has been sent to the log in email address associated with the Contact.
- Note: If SMS/Text Messaging has been enabled, the code will also be sent to the Contact’s mobile phone that is saved within their Contact profile.

Example of the Code Email Sent and the Code Log In Page in the Portal
After the code has been entered the user will be given the option to either create a password for future log in attempts or skip the password creation process which will then prompt in using a new code with the next log in attempt.

Example of the Password Creation or Skip Options After Entering Code for the Portal
-
2-Factor Authentication for Customer/Vendor Portal
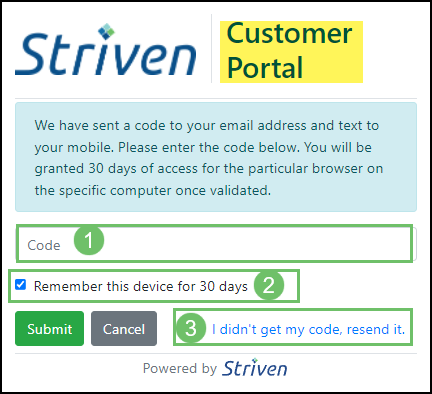
Striven has included a 2-Factor Authentication feature with the Customer/Vendor Portal to ensure your Customer/Vendor’s information is secure. The Customers/Vendors will be required to enter their Username and Password as usual, but will then be prompted to enter a 2FA code, which will be provided to them via email or text message.
- Code: Field where you can copy/paste or type in the 2FA code you receive from Striven.
- Remember this device for 30 days: Checkbox to set the system to remember the current device you’re signing in with for 30 days.
- I didn’t get my code, resend it: Link to have the 2FA code resent to you if you did not receive it when attempting to sign in.
Example of the Customer Portal 2FA Screen
- Note: In order to send the 2FA Code via text message, the Twilio Integration with Striven must be activated, and the User must have a phone number designated as “Mobile” saved in their Contact Information.
-
Account Lockout
To enhance the security of the Customer/Vendor Portal, Striven has an Account Lockout feature. This feature will protect your Customer/Vendor data by automatically locking a Portal account if a user enters the wrong password five (5) times in a row.
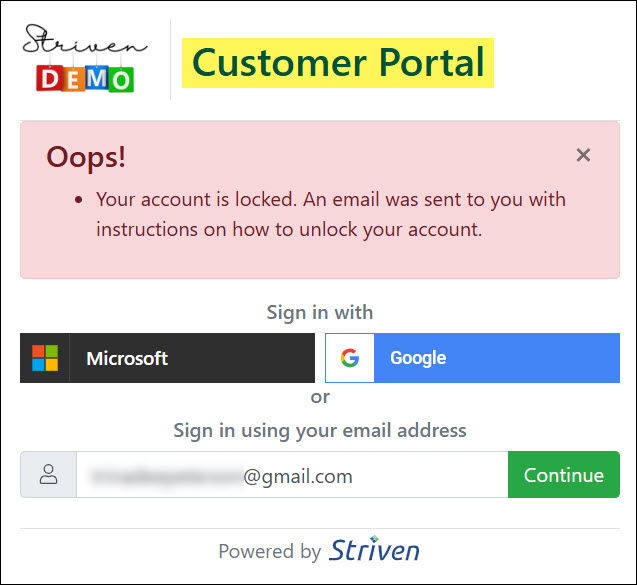
Example of the Account Lockout Alert for the Portal
If a Portal account gets locked, an email notification will be sent to the email address on record for that particular account. This email will provide a link to unlock the account.
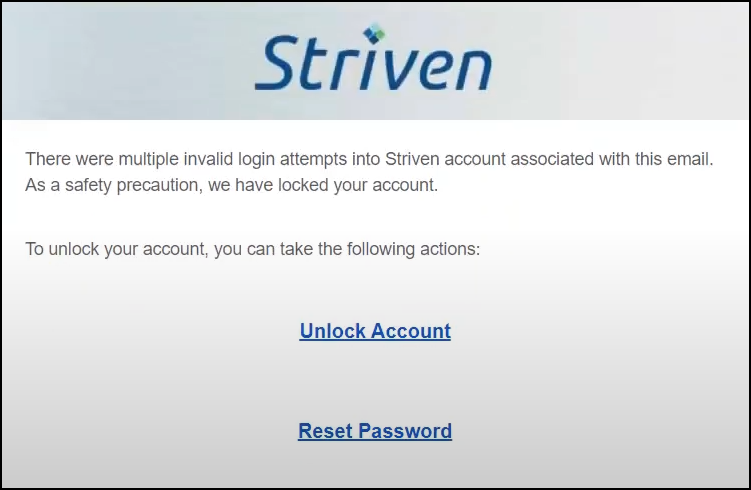
Example of the Email Notification for a Portal Account Lockout
Clicking on the link will unlock the Portal account and display a page that details the latest failed login attempts, including the Site URL, IP Address, Reason for the failed attempt, what Browser was used in the attempt, and the Date (UTC) the attempt was made. Additionally, at the bottom of this page, there is a Back to Sign-In button.
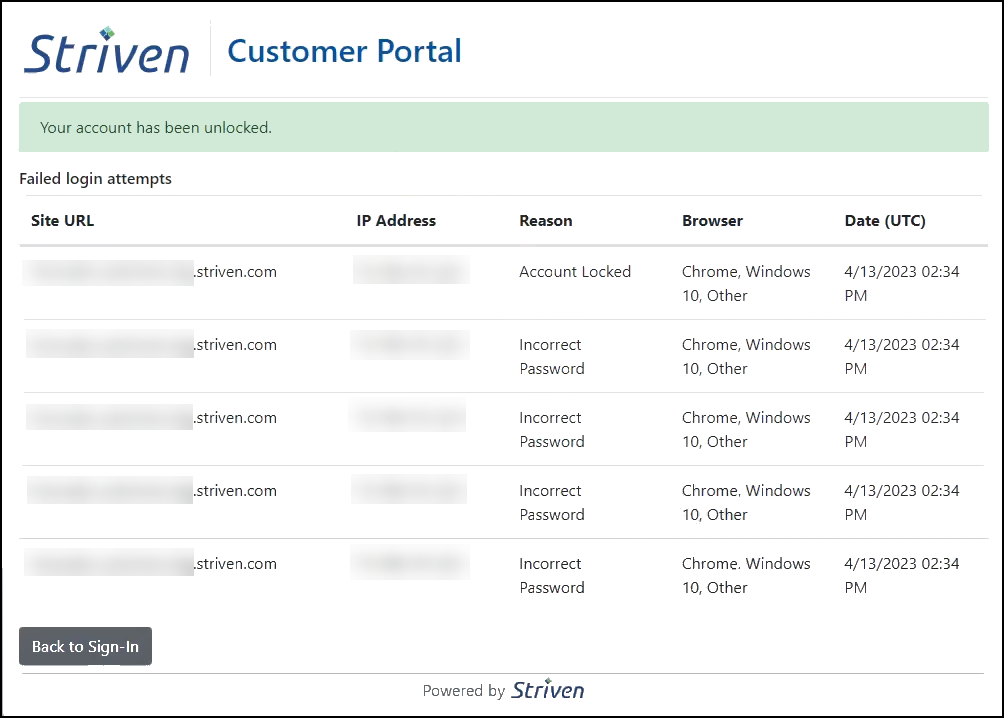
Example of the Failed Login Attempts Page for Portal Account Lockout
The email will also provide a Reset Password link that the user can use to change their password. This will help to prevent unauthorized access to the Portal account.
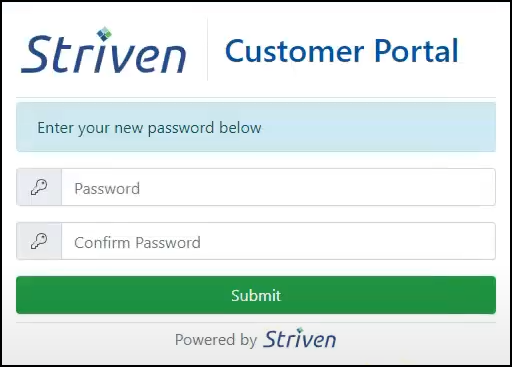
Example of the Reset Password Page for the Customer Portal
-
Recap
With this guide, we’ve discussed how to configure your Customer/Vendor Portal settings and manage the Dashboard widgets. We have covered how to set up and assign Portal Roles to contacts. Additionally, we’ve reviewed the steps to log in to the Customer/Vendor Portal.

Have a Question?
Ask the Striven Community
User-sourced how-to’s, feedback, and more!
FAQs
-
Are there additional fees associated with using the Customer/Vendor Portal with my Striven system?
For more information regarding the Customer/Vendor Portal, please visit our Pricing page or contact your Striven Consultant.
-
Why do I always need to go into Contacts profiles after they have been created in Striven and grant access and select a Portal Role?
This may be due to the configurations that you have set up on the Customer/Vendor Portal Settings page. Navigate to Company → Settings → Customers/Vendors → Portal → Settings and make sure you have the option enabled for Enable Striven Customer/Vendor Portal Access when contacts are added. You can learn more about the configuration options on this page by reviewing the Customer/Vendor Portal Settings section from the Customer/Vendor Portal Setup Guide.
-
I have an account that is set up as both a Customer and a Vendor. Is there a way to keep their log in information separate for when they log into the Customer or Vendor Portal?
The Customer and Vendor Portal are essentially the same Portal with different menu options depending on whether the account is set up as a Customer type account or Vendor type account. If you would like for Contacts to have separate log in information when logging into the Portal, you will need to create a separate account in your system, one marked as a Customer and one marked as a Vendor.